I recently wrote a blog post giving an introduction to reverse engineering and assembly language on the Purism blog. Considering that my last blog post on my own website is from 3 years ago and this post is useful beyond the needs of just Purism, I thought it might have a nice home in my own personal blog as well, so here’s a copy paste of the entire blog post, as is.
我最近在 Purism 博客上写了一篇博文,介绍了逆向工程和汇编语言。考虑到我上次在自己的网站上发表博文已经是三年前了,而且这篇文章的用途远不止 Purism 本身,我觉得它也应该放在我的个人博客里,所以就直接复制粘贴了。
Recently, I’ve finished reverse engineering the Intel FSP-S “entry” code, that is from the entry point (FspSiliconInit) all the way to the end of the function and all the subfunctions that it calls. This is only some initial foray into reverse engineering the FSP as a whole, but reverse engineering is something that takes a lot of time and effort. Today’s blog post is here to illustrate that, and to lay the foundations for understanding what I’ve done with the FSP code (in a future blog post).
最近,我完成了对英特尔 FSP-S“入口”代码的逆向工程, 即从入口点 (FspSiliconInit) 一直到函数末尾以及它调用的所有子函数。这只是对 FSP 整体进行逆向工程的初步尝试,但逆向工程是一项需要大量时间和精力的工作。今天的博客文章旨在阐明这一点,并为理解我对 FSP 代码的处理方式(在未来的博客文章中)奠定基础。
Over the years, many people asked me to teach them what I do, or to explain to them how to reverse engineer assembly code in general. Sometimes I hear the infamous “How hard can it be?” catchphrase. Last week someone I was discussing with thought that the assembly language is just like a regular programming language, but in binary form—it’s easy to make that mistake if you’ve never seen what assembly is or looks like. Historically, I’ve always said that reverse engineering and ASM is “too complicated to explain” or that “If you need help to get started, then you won’t be able to finish it on your own” and various other vague responses—I often wanted to explain to others why I said things like that but I never found a way to do it. You see, when something is complex, it’s easy to say that it’s complex, but it’s much harder to explain to people why it’s complex.
多年来,很多人请我教他们我的工作,或者向他们解释如何对汇编代码进行逆向工程。有时我会听到那句臭名昭著的“这能有多难?”的流行语。上周,我和一个人讨论时,他觉得汇编语言就像一种普通的编程语言,只不过是二进制的——如果你从未见过汇编是什么或是什么样子,就很容易犯这个错误。一直以来,我都说逆向工程和汇编“太复杂了,难以解释”,或者“如果你需要帮助才能开始,那么你将无法独自完成它”,以及其他各种含糊其辞的回答——我经常想向别人解释我为什么这么说,但我一直找不到办法。你看,当某样东西很复杂时,说它很复杂很容易,但向别人解释它为什么复杂却要困难得多。
I was lucky to recently stumble onto a little function while reverse engineering the Intel FSP, a function that was both simple and complex, where figuring out what it does was an interesting challenge that I can easily walk you through. This function wasn’t a difficult thing to understand, and by far, it’s not one of the hard or complex things to reverse engineer, but this one is “small and complex enough” that it’s a perfect example to explain, without writing an entire book or getting into the more complex aspects of reverse engineering. So today’s post serves as a “primer” guide to reverse engineering for all of those interested in the subject. It is a required read in order to understand the next blog posts I would be writing about the Intel FSP. Ready? Strap on your geek helmet and let’s get started!
最近,我在对英特尔 FSP 进行逆向工程时,有幸偶然发现了一个小函数。这个函数既简单又复杂,弄清楚它的功能是一项有趣的挑战,我可以轻松地带您了解它。这个函数并不难理解,而且到目前为止,它还不算逆向工程的难点或复杂之处,但它“足够小巧复杂”,非常适合用来解释,无需写整本书,也无需深入探讨逆向工程的更复杂方面。因此, 今天的文章可以作为所有对逆向工程感兴趣的人的“入门”指南 。 为了理解我接下来关于英特尔 FSP 的博客文章,这篇文章是必读之作。 准备好了吗?戴上你的极客头盔,我们开始吧!
DISCLAIMER: I might make false statements in the blog post below, some by mistake, some intentionally for the purpose of vulgarizing the explanations. For example, when I say below that there are 9 registers in X86, I know there are more (SSE, FPU, or even just the DS or EFLAGS registers, or purposefully not mentioning EAX instead of RAX, etc.), but I just don’t want to complicate matters by going too wide in my explanations.
免责声明 :我可能会在下面的博客文章中做出错误的陈述,有些是无意的,有些是故意的,目的是使解释变得通俗易懂。例如,当我在下面说 X86 中有 9 个寄存器时,我知道还有更多(SSE、FPU,甚至只是 DS 或 EFLAGS 寄存器,或者故意不提及 EAX 而是 RAX 等等),但我只是不想因为解释得太宽泛而使问题复杂化。
A prelude 序幕
First things first, you need to understand some basic concepts, such as “what is ASM exactly”. I will explain some basic concepts but not all the basic concepts you might need. I will assume that you know at least what a programming language is and know how to write a simple “hello world” in at least one language, otherwise you’ll be completely lost.
首先,你需要了解一些基本概念,例如“ASM 到底是什么”。我会解释一些基本概念,但不会涵盖你可能需要的所有基本概念。我假设你至少了解编程语言是什么,并且知道如何用至少一种语言编写一个简单的“Hello World”,否则你会完全不知所措。
So, ASM is the Assembly language, but it’s not the actual binary code that executes on the machine. It is however, very similar to it. To be more exact, the assembly language is a textual representation of the binary instructions given to the microprocessor. You see, when you compile your regular C program into an executable, the compiler will transform all your code into some very, very, very basic instructions. Those instructions are what the CPU will understand and execute. By combining a lot of small, simple and specific instructions, you can do more complex things. That’s the basis of any programming language, of course, but with assembly, the building blocks that you get are very limited. Before I’ll talk about instructions, I want to explain two concepts first which you’ll need to follow the rest of the story.
因此,ASM 是汇编语言,但它不是在机器上执行的实际二进制代码。然而,它与二进制代码非常相似。更准确地说,汇编语言是发送给微处理器的二进制指令的文本表示。您会看到,当您将常规 C 程序编译为可执行文件时,编译器会将所有代码转换为一些非常非常基本的指令。这些指令是 CPU 能够理解和执行的。通过组合许多短小、简单且特定的指令,您可以完成更复杂的事情。当然,这是任何编程语言的基础,但是对于汇编语言,您获得的构建块非常有限。在讨论指令之前,我想先解释两个概念,您需要了解其余部分。
The stack 堆栈
First I’ll explain what “the stack” is. You may have heard of it before, or maybe you didn’t, but the important thing to know is that when you write code, you have two types of memory:
首先我来解释一下什么是“堆栈”。你可能听说过,也可能没听说过,但重要的是要知道,当你编写代码时,有两种类型的内存:
- The first one is your “dynamic memory”, that’s when you call ‘malloc’ or ‘new’ to allocate new memory, this goes from your RAM upward (or left-to-right), in the sense that if you allocate 10 bytes, you’ll first get address 0x1000 for example, then when you allocate another 30 bytes, you’ll get address 0x100A, then if you allocate another 16 bytes, you’ll get 0x1028, etc.
第一个是“动态内存”,即调用“malloc”或“new”来分配新内存,从 RAM 向上(或从左到右)分配,例如,如果分配 10 个字节,则首先获得地址 0x1000,然后,如果分配另外 30 个字节,则获得地址 0x100A,然后,如果分配另外 16 个字节,则获得 0x1028,等等。 - The second type of memory that you have access to is the stack, which is different, instead it grows downward (or right-to-left), and it’s used to store local variables in a function. So if you start with the stack at address 0x8000, then when you enter a function with 16 bytes worth of local variables, your stack now points to address 0x7FF0, then you enter another function with 64 bytes worth of local variables, and your stack now points to address 0x7FB0, etc. The way the stack works is by “stacking” data into it, you “push” data in the stack, which puts the variable/data into the stack and moves the stack pointer down, you can’t remove an item from anywhere in the stack, you can always only remove (pop) the last item you added (pushed). A stack is actually an abstract type of data, like a list, an array, a dictionary, etc. You can read more about what a stack is on wikipedia and it shows you how you can add and remove items on a stack with this image:
您可以访问的第二种内存类型是堆栈, 它有所不同,它向下(或从右到左)增长,用于存储函数中的局部变量。因此,如果您从地址 0x8000 开始堆栈,那么当您输入一个包含 16 字节局部变量的函数时,堆栈现在指向地址 0x7FF0,然后您输入另一个包含 64 字节局部变量的函数,堆栈现在指向地址 0x7FB0,等等。堆栈的工作方式是将数据“堆叠”到其中,您将数据“推送”到堆栈中,这会将变量/数据放入堆栈并将堆栈指针向下移动,您无法从堆栈中的任何位置移除任何项目,您始终只能移除(弹出)最后添加(推送)的项目。堆栈实际上是一种抽象类型的数据,就像列表、数组、字典等一样。您可以在维基百科上阅读有关堆栈的更多信息,它通过此图像向您展示了如何在堆栈中添加和删除项目:

The image shows you what we call a LIFO (Last-In-First-Out) and that’s what a stack is. In the case of the computer’s stack, it grows downward in the RAM (as opposed to upward in the above image) and is used to store local variables as well as the return address for your function (the instruction that comes after the call to your function in the parent function). So when you look at a stack, you will see multiple “frames”, you’ll see your current function’s stack with all its variables, then the return address of the function that called it, and above it, you’ll see the previous function’s frame with its own variables and the address of the function that called it, and above, etc. all the way to the main function which resides at the top of the stack.
图中展示了我们所说的 LIFO(后进先出),这就是堆栈的本质。就计算机的堆栈而言,它在 RAM 中向下增长(而不是上图中的向上增长),用于存储局部变量以及函数的返回地址(在父函数中调用该函数之后的指令)。因此,当您查看堆栈时,您会看到多个“框架”,您会看到当前函数的堆栈及其所有变量,然后是调用该函数的返回地址,在其上方,您会看到前一个函数的框架及其自身的变量和调用该函数的地址,依此类推,一直到位于堆栈顶部的主函数。
Here is another image that exemplifies this:
这是另一张可以证明这一点的图片:

The registers 寄存器
The second thing I want you to understand is that the processor has multiple “registers”. You can think of a register as a variable, but there are only 9 total registers on x86, with only 7 of them usable. So, on the x86 processor, the various registers are: EAX, EBX, ECX, EDX, EDI, ESI, EBP, ESP, EIP.
我想让你理解的第二件事是,处理器有多个“寄存器”。你可以把寄存器想象成一个变量,但 x86 处理器上总共只有 9 个寄存器,其中只有 7 个可用。因此,在 x86 处理器上,各种寄存器分别是:EAX、EBX、ECX、EDX、EDI、ESI、EBP、ESP、EIP。
There are two registers in there that are special:
其中有两个特殊的寄存器:
- The EIP (Instruction Pointer) contains the address of the current instruction being executed.
EIP(指令指针)包含当前正在执行的指令的地址。 - The ESP (Stack Pointer) contains the address of the stack.
ESP(堆栈指针)包含堆栈的地址。
Access to the registers is extremely fast when compared to accessing the data in the RAM (the stack also resides on the RAM, but towards the end of it) and most operations (instructions) have to happen on registers. You’ll understand more when you read below about instructions, but basically, you can’t use an instruction to say “add value A to value B and store it into address C”, you’d need to say “move value A into register EAX, then move value B into register EBX, then add register EAX to register EBX and store the result in register ECX, then store the value of register ECX into the address C”.
与访问 RAM 中的数据相比,访问寄存器的速度极快(堆栈也位于 RAM 中,但位于 RAM 的末尾),而且大多数操作(指令)都必须在寄存器上执行。阅读下文关于指令的内容,您将对此有更深入的理解。但基本上,您不能使用指令来表示“将值 A 添加到值 B 并将其存储到地址 C”,而应该使用指令来表示“将值 A 移动到寄存器 EAX,然后将值 B 移动到寄存器 EBX,然后将寄存器 EAX 添加到寄存器 EBX 并将结果存储在寄存器 ECX 中,最后将寄存器 ECX 的值存储到地址 C”。
The instructions 说明
Let’s go back to explaining instructions now. As I explained before, the instructions are the basic building blocks of the programs, and they are very simple, they take the form of:
现在让我们回过头来解释指令。正如我之前解释的那样,指令是程序的基本组成部分,它们非常简单,其形式如下:
INS OP1, OP2, OP3
Where “INS” is the instruction”, and OP1, OP2, OP3 is what we call the “operand”, most instructions will only take 2 operands, some will take no operands, some will take one operand and others will take 3 operands. The operands are usually registers. Sometimes, the operand can be an actual value (what we call an “immediate value”) like “1”, “2” or “3”, etc. and sometimes, the operand is a relative position from a register, like for example “[%eax + 4]” meaning the address pointed to by the %eax register + 4 bytes. We’ll see more of that shortly. For now, let’s give you the list of the most common and used instructions:
其中“INS”是指令,OP1、OP2、OP3 是我们所说的“操作数”,大多数指令只接受 2 个操作数,有些指令不接受任何操作数,有些指令接受一个操作数,而有些指令接受 3 个操作数。操作数通常是寄存器。有时,操作数可以是实际值(我们称之为“立即数”),如“1”、“2”或“3”等,有时,操作数是相对于寄存器的相对位置,例如“[%eax + 4]”表示%eax 寄存器+4 个字节指向的地址。我们很快会看到更多。现在,让我们为您提供最常见和最常用的指令列表:
- “MOV“: move data from one operand into another
“ MOV “:将数据从一个操作数移动到另一个操作数 - “ADD/SUB/MUL/DIV“: Add, Substract, Multiply, Divide one operand with another and store the result in a register
“ ADD / SUB / MUL / DIV “: 将一个操作数与另一个操作数相加、相减、相乘、相除,并将结果存储在寄存器中 - “AND/OR/XOR/NOT/NEG“: Perform logical and/or/xor/not/negate operations on the operand
“ AND / OR / XOR / NOT / NEG “: 对操作数执行逻辑与/或/异或/非/取反运算 - “SHL/SHR“: Shift Left/Shift Right the bits in the operand
“ SHL / SHR “:左移/右移操作数中的位 - “CMP/TEST“: Compare one register with an operand
“ CMP / TEST “:将一个寄存器与一个操作数进行比较 - “JMP/JZ/JNZ/JB/JS/etc.”: Jump to another instruction (Jump unconditionally, Jump if Zero, Jump if Not Zero, Jump if Below, Jump if Sign, etc.)
“ JMP / JZ / JNZ / JB / JS / etc .”:跳转到另一条指令(无条件跳转、为零跳转、非零跳转、低于则跳转、有符号则跳转等) - “PUSH/POP“: Push an operand into the stack, or pop a value from the stack into a register
“ PUSH / POP “:将操作数推入堆栈,或将值从堆栈弹出到寄存器 - “CALL“: Call a function. This is the equivalent of doing a “PUSH %EIP+4” + “JMP”. I’ll get into calling conventions later..
“ CALL ”:调用一个函数。这相当于执行“ PUSH %EIP+4 ” + “ JMP ”。稍后我会讲解调用约定。 - “RET“: Return from a function. This is the equivalent of doing a “POP %EIP”
“ RET ”:从函数返回。这相当于执行“POP %EIP”
That’s about it, that’s what most programs are doing. Of course, there’s a lot more instructions, you can see a full list here, but you’ll see that most of the other instructions are very obscure or very specific or variations on the above instructions, so really, this represents most of the instructions you’ll ever encounter.
差不多就是这样,大多数程序都是这么做的。当然,还有很多指令,你可以在这里查看完整列表,但你会发现大多数其他指令要么非常晦涩难懂,要么非常具体,要么就是上述指令的变体。所以,实际上,这涵盖了你会遇到的大多数指令。
I want to explain one thing before we go further down: there is an additional register I didn’t mention before called the FLAGS register, which is basically just a status register that contains “flags” that indicate when some arithmetic condition happened on the last arithmetic operation. For example, if you add 1 to 0xFFFFFFFF, it will give you ‘0’ but the “Overflow flag” will be set in the FLAGS register. If you substract 5 from 0, it will give you 0xFFFFFFFB and the “Sign flag” will be set because the result is negative, and if you substract 3 from 3, the result will be zero and the “Zero flag” will be set.
在进一步讨论之前,我想先解释一下:还有一个我之前没有提到的寄存器,叫做 FLAGS 寄存器 。它本质上是一个状态寄存器,包含一些“标志”,用于指示上次算术运算中某些算术条件的发生时间。例如,如果将 1 加到 0xFFFFFFFF 上,结果为 0,但 FLAGS 寄存器中的“ 溢出标志 ”会被设置。如果从 0 中减去 5,结果为 0xFFFFFFFB,并且由于结果为负数,“ 符号标志 ”会被设置;如果从 3 中减去 3,结果为零,“ 零标志 ”会被设置。
I’ve shown you the “CMP” instruction which is used to compare a register with an operand, but you might be wondering, “What does it mean exactly to ‘compare’?” Well, it’s simple, the CMP instruction is the same thing as the SUB instruction, in that, it substracts one operand from another, but the difference is that it doesn’t store the result anywhere. However, it does get your flags updated in the FLAGS register. For example, if I wanted to compare %EAX register with the value ‘2’, and %EAX contains the value 3, this is what’s going to happen: you will substract 2 from the value, the result will be 1, but you don’t care about that, what you care about is that the ZF (Zero flag) is not set, and the SF (Sign flag is not set), which means that %eax and ‘2’ are not equal (otherwise, ZF would be set), and that the value in %eax is superior to 2 (because SF is not set), so you know that “%eax > 2” and that’s what the CMP does.
我已经向您展示了“CMP”指令,它用于将寄存器与操作数进行比较,但您可能想知道:“‘比较’到底是什么意思?” 很简单,CMP 指令与 SUB 指令相同,都是将一个操作数从另一个操作数中减去,但不同之处在于它不会将结果存储在任何地方。但是,它会更新 FLAGS 寄存器中的标志位。例如,如果我想将 %EAX 寄存器与值“2”进行比较,而 %EAX 包含值 3,那么将会发生以下情况:您将从该值中减去 2,结果将为 1,但您不关心这个,您关心的是 ZF(零标志)未设置,并且 SF(符号标志)未设置,这意味着 %eax 和“2”不相等(否则,将设置 ZF),并且 %eax 中的值大于 2(因为未设置 SF),因此您知道“%eax > 2”,这就是 CMP 所做的。
The TEST instruction is very similar but it does a logical AND on the two operands for testing, so it’s used for comparing logical values instead of arithmetic values (“TEST %eax, 1” can be used to check if %eax contains an odd or even number for example).
TEST 指令非常相似,但它对两个操作数进行逻辑与运算以进行测试,因此它用于比较逻辑值而不是算术值(例如,“TEST %eax, 1”可用于检查 %eax 是否包含奇数或偶数)。
This is useful because the next bunch of instructions I explained in the list above is conditional Jump instructions, like “JZ” (jump if zero) or “JB” (jump if below), or “JS” (jump if sign), etc. This is what is used to implement “if, for, while, switch/case, etc.” it’s as simple as doing a “CMP” followed by a “JZ” or “JNZ” or “JB”, “JA”, “JS”, etc.
这很有用,因为我在上面的列表中解释的下一堆指令是条件跳转指令,例如“JZ”(如果为零则跳转)或“JB”(如果低于则跳转)或“JS”(如果为符号则跳转)等。这就是用来实现“if、for、while、switch/case 等”的。它就像执行“CMP”后跟“JZ”或“JNZ”或“JB”、“JA”、“JS”等一样简单。
And if you’re wondering what’s the difference between a “Jump if below” and “Jump if sign” and “Jump if lower”, since they all mean that the comparison gave a negative result, right? Well, the “jump if below” is used for unsigned integers, while “jump if lower” is used for signed integers, while “jump if sign” can be misleading. An unsigned 3 – 4 would give us a very high positive result… something like that, in practice, JB checks the Carry Flag, while JS checks the Sign Flag and JL checks if the Sign Flag is equal to the Overflow flag. See the Conditional Jump page for more details.
如果你想知道“低于”和“有符号时跳转”以及“低于”之间有什么区别,因为它们都表示比较结果为负数,对吧?嗯,“低于”用于无符号整数,“低于”用于有符号整数,“有符号时跳转”可能会产生误导。无符号数 3 – 4 会给出非常高的正数结果……实际上,JB 检查进位标志 ,JS 检查符号标志 ,JL 检查符号标志是否等于溢出标志 。有关更多详细信息,请参阅条件跳转页面。
A practical example 一个实际的例子
Here’s a very small and simple practical example, if you have a simple C program like this:
这是一个非常小而简单的实际例子,如果你有一个像这样的简单 C 程序:
int main() {
   return add_a_and_b(2, 3);
}

int add_a_and_b(int a, int b) {
   return a + b;
}
It would compile into something like this:
它会编译成如下内容:
_main:
   push   3                ; Push the second argument '3' into the stack
   push   2                ; Push the first argument '2' into the stack
   call   _add_a_and_b     ; Call the _add_a_and_b function. This will put the address of the next
                           ; instruction (add) into the stack, then it will jump into the _add_a_and_b
                           ; function by putting the address of the first instruction in the _add_a_and_b
                           ; label (push %ebx) into the EIP register
   add    %esp, 8          ; Add 8 to the esp, which effectively pops out the two values we just pushed into it
   ret                     ; Return to the parent function....

_add_a_and_b:
   push   %ebx             ; We're going to modify %ebx, so we need to push it to the stack
                           ; so we can restore its value when we're done
   mov    %eax, [%esp+8]   ; Move the first argument (8 bytes above the stack pointer) into EAX
   mov    %ebx, [%esp+12]  ; Move the second argument (12 bytes above the stack pointer) into EBX
   add    %eax, %ebx       ; Add EAX and EBX and store the result into EAX
   pop    %ebx             ; Pop EBX to restore its previous value
   ret                     ; Return back into the main. This will pop the value on the stack (which was
                           ; the address of the next instruction in the main function that was pushed into
                           ; the stack when the 'call' instruction was executed) into the EIP register
Yep, something as simple as that, can be quite complicated in assembly. Well, it’s not really that complicated actually, but a couple of things can be confusing.
是的,这么简单的东西,组装起来可能相当复杂。其实也没那么复杂,只是有几点可能会让人困惑。
You have only 7 usable registers, and one stack. Every function gets its arguments passed through the stack, and can return its return value through the %eax register. If every function modified every register, then your code will break, so every function has to ensure that the other registers are unmodified when it returns (other than %eax). You pass the arguments on the stack and your return value through %eax, so what should you do if need to use a register in your function? Easy: you keep a copy on the stack of any registers you’re going to modify so you can restore them at the end of your function. In the _add_a_and_b function, I did that for the %ebx register as you can see. For more complex function, it can get a lot more complicated than that, but let’s not get into that for now (for the curious: compilers will create what we call a “prologue” and an “epilogue” in each function. In the prologue, you store the registers you’re going to modify, set up the %ebp (base pointer) register to point to the base of the stack when your function was entered, which allows you to access things without keeping track of the pushes/pops you do throughout the function, then in the epilogue, you pop the registers back, restore %esp to the value that was saved in %ebp, before you return).
您只有 7 个可用的寄存器和一个堆栈。每个函数都通过堆栈传递参数,并通过 %eax 寄存器返回其返回值。如果每个函数都修改了每个寄存器,那么您的代码就会崩溃,因此每个函数都必须确保返回时其他寄存器(%eax 除外)未被修改。您将参数传递到堆栈,并通过 %eax 传递返回值,那么如果您需要在函数中使用寄存器,该怎么办?很简单:在堆栈上保留要修改的任何寄存器的副本,以便在函数结束时恢复它们。在 _ add_a_and_b 函数中,我对 %ebx 寄存器执行了同样的操作,如您所见。对于更复杂的函数,它可能会变得比这复杂得多,但现在我们先不讨论这个(对于好奇的人:编译器将在每个函数中创建我们所说的“序言”和“结语”。在序言中,存储要修改的寄存器,设置%ebp(基指针)寄存器以指向输入函数时的堆栈底部,这允许您访问东西而不必跟踪在整个函数过程中执行的推送/弹出,然后在结语中,将寄存器弹出,将%esp 恢复为保存在%ebp 中的值,然后再返回)。
The second thing you might be wondering about is with these lines:
您可能想知道的第二件事是这些行:
mov %eax, [%esp+8]
mov %ebx, [%esp+12]
And to explain it, I will simply show you this drawing of the stack’s contents when we call those two instructions above:
为了解释这一点,我将简单地向您展示当我们调用上述两个指令时堆栈内容的绘图:
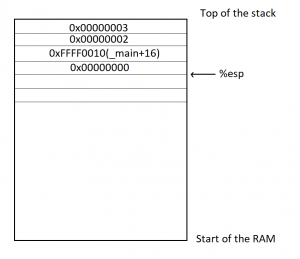
For the purposes of this exercise, we’re going to assume that the _main function is located in memory at the address 0xFFFF0000, and that each instructoin is 4 bytes long (the size of each instruction can vary depending on the instruction and on its operands). So you can see, we first pushed 3 into the stack, %esp was lowered, then we pushed 2 into the stack, %esp was lowered, then we did a ‘call _add_a_and_b’, which stored the address of the next instruction (4 instructions into the main, so ‘_main+16’) into the stack and esp was lowered, then we pushed %ebx, which I assumed here contained a value of 0, and the %esp was lowered again. If we now wanted to access the first argument to the function (2), we need to access %esp+8, which will let us skip the saved %ebx and the ‘Return address’ that are in the stack (since we’re working with 32 bits, each value is 4 bytes). And in order to access the second argument (3), we need to access %esp+12.
为了完成本练习,我们假设 _main 函数位于内存地址 0xFFFF0000 处,并且每条指令长度为 4 个字节(每条指令的长度可能因指令本身及其操作数而异)。因此,您可以看到,我们首先将 3 压入堆栈,%esp 的值被降低;然后,我们将 2 压入堆栈,%esp 的值被降低;接着,我们执行了“call _add_a_and_b”,它将下一条指令的地址(主函数中的 4 条指令,即“_main+16”)压入堆栈,%esp 的值被降低;最后,我们压入 %ebx(我假设此处其值为 0),%esp 的值再次被降低。如果我们现在想访问函数的第一个参数 (2),我们需要访问 %esp+8,这样我们就可以跳过保存的 %ebx 和堆栈中的“返回地址”(因为我们使用的是 32 位,所以每个值占 4 个字节)。为了访问第二个参数 (3),我们需要访问 %esp+12。
Binary or assembly? 二进制还是汇编?
One question that may (or may not) be popping into your mind now is “wait, isn’t this supposed to be the ‘computer language’, so why isn’t this binary?” Well, it is… in a way. As I explained earlier, “the assembly language is a textual representation of the binary instructions given to the microprocessor”, what it means is that those instructions are given to the processor as is, there is no transformation of the instructions or operands or anything like that. However, the instructions are given to the microprocessor in binary form, and the text you see above is just the textual representation of it.. kind of like how “68 65 6c 6c 6f” is the hexadecimal representation of the ASCII text “hello”. What this means is that each instruction in assembly language, which we call a ‘mnemonic’ represents a binary instruction, which we call an ‘opcode’, and you can see the opcodes and mnemonics in the list of x86 instructions I gave you above. Let’s take the CALL instruction for example. The opcode/mnemonic list is shown as:
现在你可能会(也可能不会)想到一个问题:“等等,这难道不是‘计算机语言’吗?那为什么不是二进制的呢?” 嗯,某种程度上来说,它是。正如我之前解释的那样,“汇编语言是发送给微处理器的二进制指令的文本表示”,这意味着这些指令是按原样发送给处理器的,没有指令、操作数或类似内容的转换。然而,指令是以二进制形式发送给微处理器的,你上面看到的文本只是它的文本表示……有点像“68 65 6c 6c 6f”是 ASCII 文本“hello”的十六进制表示。这意味着汇编语言中的每条指令(我们称之为“助记符”)都代表一条二进制指令(我们称之为“操作码”),你可以在我上面提供的 x86 指令列表中看到操作码和助记符。以 CALL 指令为例,其操作码/助记符列表如下:
| Opcode 操作码 | Mnemonic 助记符 | Description 描述 |
|---|---|---|
E8 cw | CALL rel16 | Call near, relative, displacement relative to next instruction 调用附近、相对、相对于下一条指令的位移 |
E8 cd | CALL rel32 | Call near, relative, displacement relative to next instruction 调用附近、相对、相对于下一条指令的位移 |
FF /2 | CALL r/m16 | Call near, absolute indirect, address given in r/m16 附近调用,绝对间接,地址在 r/m16 中给出 |
FF /2 | CALL r/m32 | Call near, absolute indirect, address given in r/m32 附近调用,绝对间接,地址以 r/m32 给出 |
9A cd | CALL ptr16:16 | Call far, absolute, address given in operand 远调用,绝对调用,操作数中给出地址 |
9A cp | CALL ptr16:32 | Call far, absolute, address given in operand 远调用,绝对调用,操作数中给出地址 |
FF /3 | CALL m16:16 | Call far, absolute indirect, address given in m16:16 远调用,绝对间接,地址在 m16:16 中给出 |
FF /3 | CALL m16:32 | Call far, absolute indirect, address given in m16:32 远调用,绝对间接,地址在 m16:32 中给出 |
This means that this same “CALL” mnemonic can have multiple addresses to call. Actually, there are four different possitiblities, each having a 16 bits and a 32 bits variant. The first possibility is to call a function with a relative displacement (Call the function 100 bytes below this current position), or an absolute address given in a register (Call the function whose address is stored in %eax) or an absolute address given as a pointer (Call the function at address 0xFFFF0100), or an absolute address given as an offset to a segment (I won’t explain segments now). In our example above, the “call _add_a_and_b” was probably stored as a call relative to the current position with 12 bytes below the current instruction (4 bytes per instruction, and we have the CALL, ADD, RET instructions to skip). This means that the instruction in the binary file was encoded as “E8 00 00 00 0C” (The E8 opcode to mean a “CALL near, relative”, and the “00 00 00 0C” to mean 12 bytes relative to the current instruction). Now, the most observant of you have probably noticed that this CALL instruction takes 5 bytes total, not 4, but as I said above, we will assume it’s 4 bytes per instruction just for the sake of keeping things simple, but yes, the CALL (in this case) is 5 bytes, and other instructions will sometimes have more or less bytes as well.
这意味着同一个“CALL”助记符可以有多个要调用的地址。实际上,有四种不同的可能性,每种都有 16 位和 32 位变体。第一种可能性是使用相对位移(调用当前位置以下 100 字节的函数)或寄存器中给出的绝对地址(调用地址存储在 %eax 中的函数)或以指针给出的绝对地址(调用地址 0xFFFF0100 的函数)或以段偏移量给出的绝对地址(我现在不会解释段)来调用函数。在上面的例子中,“call _add_a_and_b”可能存储为相对于当前位置的调用,比当前指令低 12 个字节(每条指令 4 个字节,我们需要跳过 CALL、ADD、RET 指令)。这意味着二进制文件中的指令被编码为“E8 00 00 00 0C”(E8 操作码表示“相对近调用”,而“00 00 00 0C”表示相对于当前指令的 12 个字节)。现在,细心的读者可能已经注意到,这个 CALL 指令总共占用 5 个字节,而不是 4 个。但正如我上面所说,为了简单起见,我们假设每条指令占用 4 个字节。没错,在本例中,CALL 指令占用 5 个字节,其他指令有时也会占用更多或更少的字节。
I chose the CALL function above for example, because I think it’s the least complicated to explain.. other instructions have even more complicated opcodes and operands (See the ADD and ADC (Add with Cary) instructions for example, you’ll notice the same opcodes shared between them even, so they are the same instruction, but it’s easy to give them separate mnemonics to differentiate their behaviors).
我选择上面的 CALL 函数作为示例,因为我认为它解释起来最简单。其他指令有更复杂的操作码和操作数(例如,参见 ADD 和 ADC (用 Cary 添加)指令,您会注意到它们之间共享相同的操作码,因此它们是相同的指令,但很容易为它们提供单独的助记符来区分它们的行为)。
Here’s a screenshot showing a side by side view of the Assembly of a function with the hexadecimal view of the binary:
下面是一个屏幕截图,并排显示了函数的汇编视图和二进制的十六进制视图:
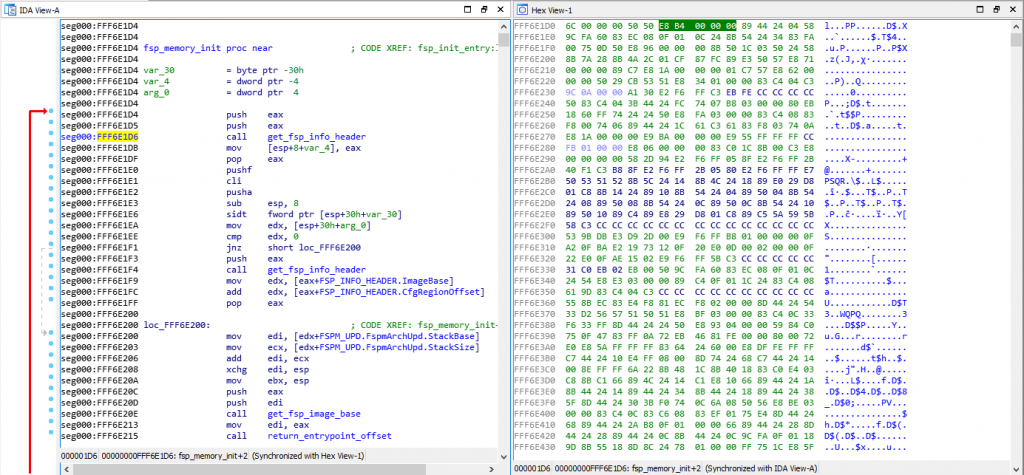
As you can see, I have my cursor on address 0xFFF6E1D6 on the assembly view on the left, which is also highlighted on the hex view on the right. That address is a CALL instruction, and you can see the equivalent hex of “E8 B4 00 00 00”, which means it’s a CALL near, relative (E8 being the opcode for it) and the function is 0xB4 (180) bytes below our current position of 0xFFF6E1D6.
如你所见,我的光标位于左侧汇编视图中的地址 0xFFF6E1D6 上,该地址在右侧的十六进制视图中也高亮显示。该地址是一个 CALL 指令,你可以看到其对应的十六进制值“E8 B4 00 00 00”,这意味着它是一个相对近地址 CALL 指令(E8 是它的操作码),该函数位于当前位置 0xFFF6E1D6 下方 0xB4(180)字节处。
If you open the file with a hexadecimal editor, you’ll only see the hex view on the right, but you need to put the file into a Disassembler (such as the IDA disassembler which I’m using here, but there are cheaper alternatives as well, the list can be long), and the disassembler will interpret those binary opcodes to show you the textual assembly representation which is much much easier to read.
如果您使用十六进制编辑器打开文件,您将只能看到右侧的十六进制视图,但您需要将文件放入反汇编程序(例如我在这里使用的 IDA 反汇编程序,但也有更便宜的替代品, 列表可能很长),反汇编程序将解释这些二进制操作码以向您显示文本汇编表示,这更容易阅读。
Some actual reverse engineering
一些实际的逆向工程
Now that you have the basics, let’s do a quick reverse engineering exercise… This is a very simple function that I’ve reversed recently, it comes from the SiliconInit part of the FSP, and it’s used to validated the UPD configuration structure (used to tell it what to do).
现在您已经掌握了基础知识,让我们做一个快速的逆向工程练习……这是我最近逆向的一个非常简单的函数,它来自 FSP 的 SiliconInit 部分,用于验证 UPD 配置结构(用于告诉它做什么)。
Here is the Assembly code for that function:
以下是该函数的汇编代码:
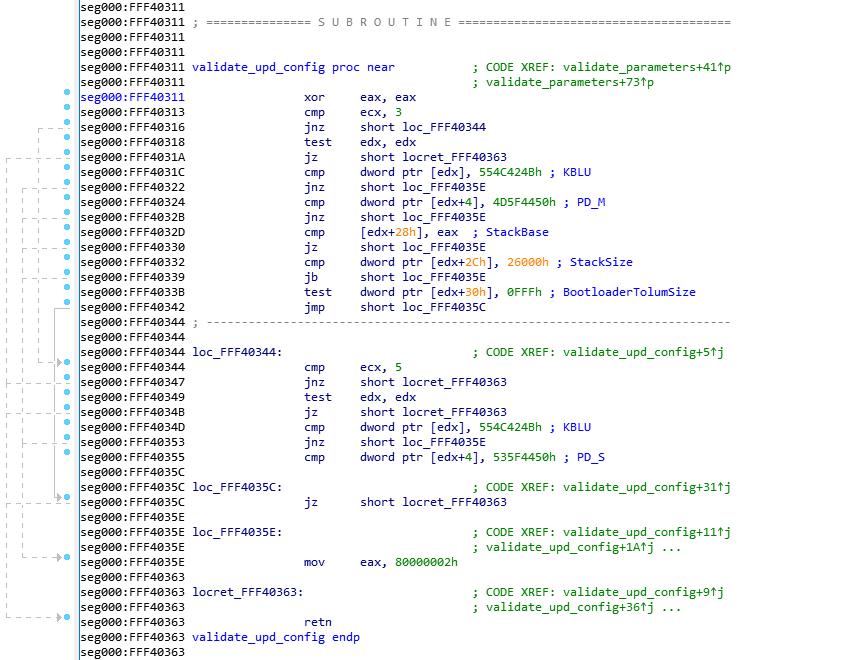
This was disassembled using IDA 7.0 (The Interactive DisAssembler) which is an incredible (but expensive) piece of software. There are other disassemblers which can do similar jobs, but I prefer IDA personally. Let’s first explain what you see on the screen.
这是用 IDA 7.0(交互式反汇编器)反汇编的,这是一款非常棒(但价格昂贵)的软件。虽然还有其他反汇编器可以完成类似的工作,但我个人更喜欢 IDA。我们先来解释一下屏幕上显示的内容。
On the left side, you see “seg000:FFF40xxx” this means that we are in the segment “seg000” at the address 0xFFF40xxx. I won’t explain what a segment is, because you don’t need to know it. The validate_upd_config function starts at address 0xFFF40311 in the RAM, and there’s not much else to understand. You can see how the address increases from one instruction to the next, it can help you calculate the size in bytes that each instruction takes in RAM for example, if you’re curious of course… (the XOR is 2 bytes, the CMP is 2 bytes, etc.).
在左侧,您会看到“seg000:FFF40xxx”,这意味着我们位于地址 0xFFF40xxx 的段“seg000”中。我不会解释什么是段,因为您不需要了解它。validate_upd_config 函数从 RAM 中的地址 0xFFF40311 开始,除此之外没有太多需要理解的内容。您可以看到地址是如何从一条指令增加到下一条指令的,这可以帮助您计算每条指令在 RAM 中占用的字节数,例如,如果您好奇的话……(XOR 是 2 个字节,CMP 是 2 个字节,等等)。
As you’ve seen in my previous example, anything after a semicolon (“;”) is considered a comment and can be ignored. The “CODE XREF” comments are added by IDA to tell us that this code has a cross-references (is being called by) some other code. So when you see “CODE XREF: validate_upd_config+9” (at 0xFF40363, the RETN instruction), it means this instruction is being called (referenced by) from the function validate_upd_config and the “+9” means 9 bytes into the function (so since the function starts at 0xFFF40311, it means it’s being called from the instruction at offset 0xFFF4031A. The little “up” arrow next to it means that it comes from above the current position in the code, and if you follow the grey lines on the left side of the screen, you can follow that call up to the address 0xFFF4031A which contains the instruction “jnz short locret_FFF40363”. I assume the “j” letter right after the up arrow is to tell us that the reference comes from a “jump” instruction.
正如你在我之前的例子中所见,分号(“;”)后面的任何内容都被视为注释,可以忽略。“CODE XREF”注释是由 IDA 添加的,用来告诉我们这段代码被其他代码交叉引用(调用)。因此,当您看到“CODE XREF:validate_upd_config+9”(在 0xFF40363,RETN 指令)时,这意味着该指令正在从函数 validate_upd_config 调用(引用),而“+9”表示进入函数的 9 个字节(因此,由于函数从 0xFFF40311 开始,这意味着它是从偏移量为 0xFFF4031A 的指令调用的。旁边的小“向上”箭头表示它来自代码中当前位置的上方,如果您沿着屏幕左侧的灰线走,您可以沿着该调用一直到地址 0xFFF4031A,其中包含指令“jnz short locret_FFF40363”。我认为向上箭头后面的“j”字母是为了告诉我们引用来自“跳转”指令。
As you can see in the left side of the screen, there are a lot of arrows, that means that there’s a lot of jumping around in the code, even though it’s not immediatly obvious. The awesome IDA software has a “layout view” which gives us a much nicer view of the code, and it looks like this:
正如您在屏幕左侧看到的,有很多箭头,这意味着代码中有很多跳动,即使它不是立即可见的。强大的 IDA 软件有一个“布局视图”,可以让我们更好地查看代码,它看起来像这样:
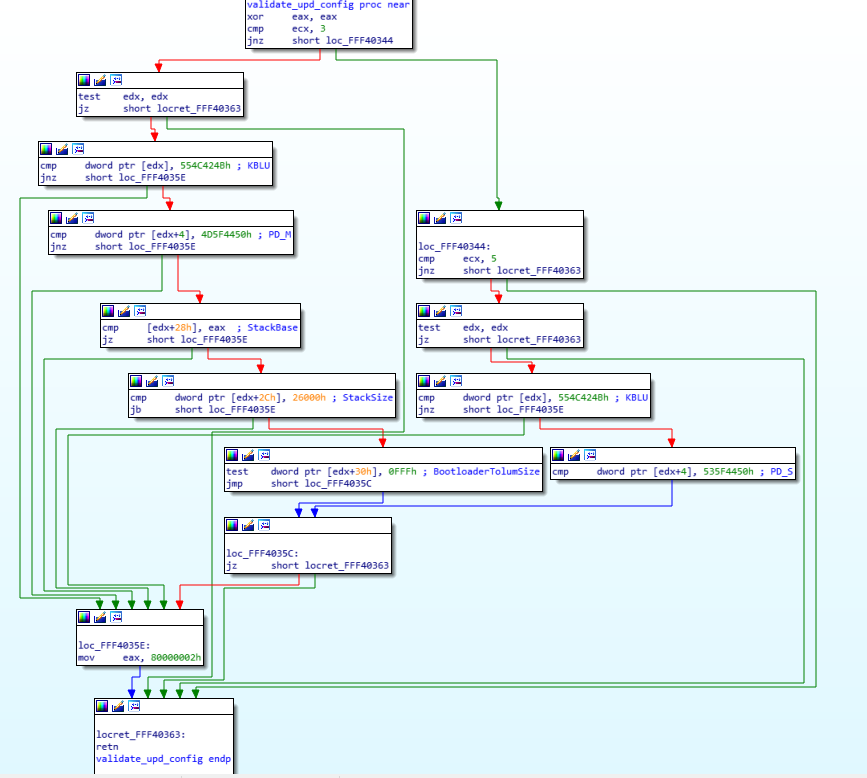
Now you can see each block of code separately in their own little boxes, with arrows linking all of the boxes together whenever a jump happens. The green arrows mean that it’s a conditional jump when the condition is successful, while the red arrows means the condition was not successful. This means that a “JZ” will show a green arrow towards the code it would jump to if the result is indeed zero, and a red arrow towards the block where the result is not zero. A blue arrow means that it’s an unconditional jump.
现在,您可以看到每个代码块分别位于各自的小方框中,每当发生跳转时,箭头都会将所有方框连接在一起。绿色箭头表示条件成立时为条件跳转,红色箭头表示条件不成立。这意味着“JZ”将显示绿色箭头指向结果确实为零时将跳转到的代码,红色箭头指向结果不为零的代码块。蓝色箭头表示无条件跳转。
I usually always do my reverse engineering using the layout view, I find it much easier to read/follow, but for the purpose of this exercise, I will use the regular linear view instead, so I think it will be easier for you to follow with that instead. The reason is mostly because the layout view doesn’t display the address of each instruction, and it’s easier to have you follow along if I can point out exactly which instruction I’m looking it by mentioning its address.
我通常使用布局视图进行逆向工程,我发现它更容易阅读/理解,但为了本次练习的目的,我将使用常规的线性视图,这样我认为你更容易理解。主要原因是布局视图不显示每条指令的地址,如果我能通过提及地址来准确地指出我正在查看的是哪条指令,会更容易让你理解。
Now that you know how to read the assembly code, you understand the various instructions, I feel you should be ready to reverse engineering this very simple assembly code (even though it might seem complex at first). I just need to give you the following hints first:
现在你已经知道如何阅读汇编代码,并且理解了各种指令,我觉得你应该已经准备好对这段非常简单的汇编代码进行逆向工程了(尽管它乍一看可能很复杂)。我只需要先给你以下提示:
- Because I’ve already reversed engineering it, you get the beautiful name “validate_upd_config” for the function, but technically, it was simply called “sub_FFF40311”
因为我已经对其进行了逆向工程,所以该函数有一个漂亮的名称“validate_upd_config”,但从技术上讲,它应该简称为“sub_FFF40311”。 - I had already reverse engineered the function that called it so I know that this function is receiving its arguments in an unusual way. The arguments aren’t pushed to the stack, instead, the first argument is stored in %ecx, and the second argument is stored in %edx
我已经对调用它的函数进行了逆向工程,所以我知道这个函数以一种不寻常的方式接收参数。参数没有被压入堆栈,而是将第一个参数存储在 %ecx 中,将第二个参数存储在 %edx 中。 - The first argument (%ecx, remember?) is an enum to indicate what type of UPD structure to validate, let me help you out and say that type ‘3’ is the FSPM_UPD (The configuration structure for the FSPM, the MemoryInit function), and that type ‘5’ is the FSPS_UPD (The configuration structure for the FSPS, the SiliconInit function).
第一个参数(%ecx,记得吗?)是一个枚举,用于指示要验证什么类型的 UPD 结构,让我来帮您解释一下,类型“3”是 FSPM_UPD(FSPM 的配置结构,MemoryInit 函数),类型“5”是 FSPS_UPD(FSPS 的配置结构,SiliconInit 函数)。 - Reverse engineering is really about reading one line at a time, in a sequential manner, keep track of which blocks you reversed and be patient. You can’t look at it and expect to understand the function by viewing the big picture.
逆向工程的本质是按顺序逐行阅读,追踪你逆向的块,并保持耐心。你不能仅仅通过观察全局就能理解整个函数。 - It is very very useful in this case to have a dual monitor, so you can have one monitor for the assembly, and the other monitor for your C code editor. In my case, I actually recently bought an ultra-wide monitor and I split screen between my IDA window and my emacs window and it’s great. It’s hard otherwise to keep going back and forth between the assembly and the C code. That being said, I would suggest you do the same thing here and have a window on the side showing you the assembly image above (not the layout view) while you read the explanation on how to reverse engineer it below.
在这种情况下,双显示器非常有用,这样你就可以用一个显示器来查看汇编代码,另一个显示器来查看 C 代码编辑器。就我而言,我最近买了一台超宽显示器,我把 IDA 窗口和 emacs 窗口分屏显示,效果很好。否则,在汇编代码和 C 代码之间来回切换会很麻烦。话虽如此,我建议你在这里也这样做,在侧面打开一个窗口,显示上面的汇编代码图像(而不是布局视图),同时阅读下面关于如何对其进行逆向工程的说明。
Got it? All done? No? Stop sweating and hyperventilating… I’ll explain exactly how to reverse engineer this function in the next paragraph, and you will see how simple it turns out to be!
明白了吗?全部搞定?还没?别再汗流浃背、呼吸急促了……下一段我会详细解释如何逆向这个函数,你会看到它有多么简单!
Let’s get started! 让我们开始吧!
The first thing I do is write the function in C. Since I know the name and its arguments already, I’ll do that:
我做的第一件事是用 C 语言编写该函数。由于我已经知道了函数名称及其参数,因此我会这样做:
void validate_upd_config (uint8_t action, void *config) {
}
Yeah, there’s not much to it yet, and I set it to return “void” because I don’t know if it returns anything else, and I gave the first argument “action” as a “uint8_t” because in the parent function it’s used a single byte register (I won’t explain for now how to differentiate 1-byte, 2-bytes, 4-bytes and 8-bytes registers). The second argument is a pointer, but I don’t know it’s a pointer to what kind of structure exactly, so I just set it as a void *.
是的,目前还没有太多内容,我将其设置为返回“void”,因为我不知道它是否返回其他值。我将第一个参数“action”设置为“uint8_t”,因为在父函数中它使用单字节寄存器(我现在不会解释如何区分 1 字节、2 字节、4 字节和 8 字节寄存器)。第二个参数是一个指针,但我不知道它具体指向哪种结构体,所以我就将其设置为 void * 。
The first instruction is a “xor eax, eax”. What does this do? It XORs the eax register with the eax register and stores the result in the eax register itself, which is the same thing as “mov eax, 0”, because 1 XOR 1= 0 and 0 XOR 0 = 0, so if every bit in the eax register is logically XORed with itself, it will give 0 for the result. If you’re asking yourself “Why did the compiler decide to do ‘xor eax, eax’ instead of ‘mov eax, 0’ ?” then the answer is simple: “Because it takes less CPU clock cycles to do a XOR, than to do a move”, which means it’s more optimized and it will run faster. Besides, the XOR takes 2 bytes as you can see above (the address of the instructions jumped from FFF40311 to FFF40313), while a “mov eax, 0” would have taken 5 bytes. So it also helps keep the code smaller.
第一条指令是“xor eax, eax”。它起什么作用?它将 eax 寄存器与 eax 寄存器进行异或运算,并将结果存储在 eax 寄存器本身中,这与“mov eax, 0”相同,因为 1 XOR 1= 0 且 0 XOR 0 = 0 ,因此如果 eax 寄存器中的每一位都与自身进行逻辑异或,则结果将为 0。如果您问自己“为什么编译器决定执行“xor eax, eax”而不是“mov eax, 0”?”那么答案很简单:“因为执行异或运算比执行移动所需的 CPU 时钟周期更少”,这意味着它更加优化并且运行速度更快。此外,如上所示,异或运算占用 2 个字节(指令的地址从 FFF40311 跳到 FFF40313),而“mov eax, 0”占用 5 个字节。因此它也有助于保持代码更小。
Alright, so now we know that eax is equal to 0, let’s keep that in mind and move along (I like to keep track of things like that as comments in my C code). Next instruction does a “cmp ecx, 3”, so it’s comparing ecx, which we already know is our first argument (uint8_t action), ok, it’s a comparison, not much to do here, again let’s keep that in mind and continue… the next instruction does a “jnz short loc_FFF40344”, which is more interesting, so if the previous comparison is NOT ZERO, then jump to the label loc_FFF40344 (for now ignore the “short”, it just helps us differentiate between the various mnemonics, and it means that the jump is a relative offset that fits in a “short word” which means 2 bytes, and you can confirm that the jnz instruction does indeed take only 2 bytes of code). Great, so there’s a jump if the result is NOT ZERO, which means that if the result is zero, the code will just continue, which means if the ecx register (action variable) is EQUAL (substraction is zero) to 3, the code will continue down to the next instruction instead of jumping… let’s do that, and in the meantime we’ll update our C code:
好了,现在我们知道 eax 等于 0,让我们记住这一点并继续往下看(我喜欢在 C 代码中以注释的形式记录这类事情)。下一条指令执行“cmp ecx, 3”,所以它比较 ecx,我们已经知道它是我们的第一个参数(uint8_t 操作),好的,这是一个比较,这里没什么可做的,让我们再次记住这一点并继续……下一条指令执行“jnz short loc_FFF40344”,这更有趣,所以如果前一个比较结果不为零,则跳转到标签 loc_FFF40344(现在忽略“short”,它只是帮助我们区分不同的助记符,这意味着跳转是一个相对偏移量,适合一个“短字”,即 2 个字节,你可以确认 jnz 指令确实只占用 2 个字节的代码)。太好了,如果结果不为零,就会跳转,这意味着如果结果为零,代码将继续,这意味着如果 ecx 寄存器(动作变量)等于(减法为零)3,代码将继续执行下一条指令而不是跳转…让我们这样做,同时我们将更新我们的 C 代码:
void validate_upd_config (uint8_t action, void *config) {
   // eax = 0
   if (action == 3) {
      // 0xFFF40318
   } else {
      // loc_FFF40344
   }
}
The next instruction is “test edx, edx”. We know that the edx register is our second argument which is the pointer to the configuration structure. As I explained above, the “test” is just like a comparison, but it does an AND instead of a substraction, so basically, you AND edx with itself.. well, of course, that has no consequence, 1 AND 1 = 1, and 0 AND 0 = 0, so why is it useful to test a register against itself? Simply because the TEST will update our FLAGS register… so when the next instruction is “JZ” it basically means “Jump if the edx register was zero”… And yes, doing a “TEST edx, edx” is more optimized than doing a “CMP edx, 0”, you’re starting to catch on, yeay!
下一条指令是“test edx, edx”。我们知道 edx 寄存器是我们的第二个参数,它是指向配置结构的指针。正如我上面解释的那样,“test”就像一个比较,但它执行的是“与”而不是“减”,所以基本上,你将 edx 与自身进行“与”运算……当然,这没有任何意义, 1 AND 1 = 1,0 AND 0 = 0 ,那么为什么测试寄存器本身是有用的呢?很简单,因为 TEST 会更新我们的 FLAGS 寄存器……所以当下一条指令是“JZ”时,它基本上意味着“如果 edx 寄存器为零,则跳转”……是的,执行“TEST edx, edx”比执行“CMP edx, 0”更优化,你开始明白了,是的!
And indeed, the next instruction is “jz locret_FFF40363”, so if the edx register is ZERO, then jump to locret_FFF40363, and if we look at that locret_FFF40363, it’s a very simple “retn” instruction. So our code becomes:
确实,下一条指令是“jz locret_FFF40363”,所以如果 edx 寄存器为零,就跳转到 locret_FFF40363。如果我们查看 locret_FFF40363,会发现它其实是一个非常简单的“retn”指令。所以我们的代码变成了:
void validate_upd_config (uint8_t action, void *config) {
  // eax = 0
  if (action == 3) {
    if (config == NULL)
       return;
  } else {
    // loc_FFF40344
  }
}
Next! Now it gets slightly more complicated… the instruction is: “cmp dword ptr [edx], 554C424Bh”, which means we do a comparison of a dword (4 bytes), of the data pointed to by the pointer edx, with no offset (“[edx]” is the same as saying “edx[0]” if it was a C array for example), and we compare it to the value 554C424Bh… the “h” at the end means it’s a hexadecimal value, and with experience you can quickly notice that the hexadecimal value is all within the ASCII range, so using a Hex to ASCII converter, we realize that those 4 bytes represent the ASCII letters “KBLU” (which is why I manually added them as a comment to that instruction, so I won’t forget). So basically the instruction compares the first 4 bytes of the structure (the content pointed to by the edx pointer) to the string “KBLU”. The next instruction does a “jnz loc_FFF4035E” which means that if the comparison result is NOT ZERO (so, if they are not equal) we jump to loc_FFF4035E.
接下来!现在它变得稍微复杂一些……指令是:“cmp dword ptr [edx], 554C424Bh”,这意味着我们对指针 edx 指向的数据的一个双字(4 个字节)进行比较,没有偏移量(例如,如果是 C 数组,“[edx]” 与 “edx[0]” 相同),然后将其与值 554C424Bh 进行比较……末尾的“h”表示它是一个十六进制值,根据经验,您可以快速注意到十六进制值都在 ASCII 范围内,因此使用十六进制到 ASCII 的转换器,我们意识到这 4 个字节代表 ASCII 字母“KBLU”(这就是我手动将它们作为注释添加到该指令的原因,这样我就不会忘记)。所以基本上,该指令将结构的前 4 个字节(edx 指针指向的内容)与字符串“KBLU”进行比较。下一条指令是“jnz loc_FFF4035E”,这意味着如果比较结果不为零(因此,如果它们不相等),我们跳转到 loc_FFF4035E。
Instead of continuing sequentially, I will see what that loc_FFF4035E contains (of course, I did the same thing in all the previous jumps, and had to decide if I wanted to continue reverse engineering the jump or the next instruction, in this case, it seems better for me to jump, you’ll see why soon). The loc_FFF4035E label contains the following instruction: “mov, eax, 80000002h”, which means it stores the value 0x80000002 into the eax register, and then it jumps to (not really, it just naturally flows to the next instruction which happens to be the label) locret_FFF40363, which is just a “retn”. This makes our code into this:
我不会继续按顺序执行,而是会查看 loc_FFF4035E 包含的内容(当然,我在前面的所有跳转指令中都做了同样的事情,并且必须决定是继续逆向跳转指令还是下一条指令,在这种情况下,我似乎更倾向于跳转,你很快就会明白为什么)。loc_FFF4035E 标签包含以下指令:“mov, eax, 80000002h”,这意味着它将值 0x80000002 存储到 eax 寄存器中,然后跳转到(并非如此,它只是自然地流向下一条指令,而该指令恰好是标签)locret_FFF40363,这只是一个“retn”。这使我们的代码变成这样:
uint32_t validate_upd_config (uint8_t action, void *config) {
  // eax = 0
  if (action == 3) {
    if (config == NULL)
       return 0;
    if (((uint32_t *)config)[0] != 0x554C524B)
       return 0x80000002;
  } else {
    // loc_FFF40344
  }
}
The observant here will notice that I’ve changed the function prototype to return a uint32_t instead of “void” and my previous “return” has become “return 0” and the new code has a “return 0x80000002”. That’s because I realized at this point that the “eax” register is used to return a uint32_t value. And since the first instruction was “xor eax, eax”, and we kept in the back of our mind that “eax is initialized to 0”, it means that the use case with the (config == NULL) will return 0. That’s why I made all these changes…
细心的人会注意到,我修改了函数原型,使其返回 uint32_t 类型而不是“void”,之前的“return”变成了“return 0”,而新代码中的“return 0x80000002”则变成了“return 0x80000002”。这是因为我此时意识到“eax”寄存器用于返回 uint32_t 值。由于第一条指令是“xor eax, eax”,而我们又记住了“eax 被初始化为 0”,这意味着 (config == NULL) 的用例将返回 0。这就是我做出所有这些修改的原因……
Very well, let’s go back to where we were, since we’ve exhausted this jump, we’ll jump back in reverse to go back to the address FFF40322 and continue from there to the next instruction. It’s a “cmp dword ptr [edx+4], 4D5F4450h”, which compares the dword at edx+4 to 0x4D5F4450, which I know to be the ASCII for “PD_M”; this means that the last 3 instructions are used to compare the first 8 bytes of our pointer to “KBLUPD_M”… ohhh, light bulb above our heads, it’s comparing the pointer to the Signature of the FSPM_UPD structure (don’t forget, you weren’t supposed to know that the function is called validate_upd_config, or that the argument is a config pointer… just that it’s a pointer)! OK, now it makes sense, and while we’re at it—and since we are, of course, reading the FSP integration guide PDF, we then also realize what the 0x80000002 actually means. At this point, our code now becomes:
好吧,让我们回到刚才的位置。既然我们已经完成了这次跳转,我们将反向跳转回到地址 FFF40322,并从那里继续执行下一条指令。它是一条“cmp dword ptr [edx+4], 4D5F4450h”,它将 edx+4 处的双字与 0x4D5F4450 进行比较,我知道这是“PD_M”的 ASCII 码;这意味着最后 3 条指令用于将指针的前 8 个字节与“KBLUPD_M”进行比较……哦,我们突然灵光一闪,它正在将指针与 FSPM_UPD 结构的签名进行比较(别忘了,你不应该知道该函数名为 validate_upd_config,或者参数是一个配置指针……只是知道它是一个指针)!好的,现在一切都说得通了。既然我们正在阅读 FSP 集成指南 PDF,我们也就明白了 0x80000002 的实际含义。此时,我们的代码变成了:
EFI_STATUS validate_upd_config (uint8_t action, void *config) {
  if (action == 3) {
    FSPM_UPD *upd = (FSPM_UPD *) config;
    if (upd == NULL)
       return EFI_SUCCESS;
    if (upd->FspUpdHeader.Signature != 0x4D5F4450554C524B /* 'KBLUPD_M'*/)
       return EFI_INVALID_PARAMETERS;
  } else {
    // loc_FFF40344
  }
}
Yay, this is starting to look like something… Now you probably got the hang of it, so let’s do things a little faster now.
是啊,这开始看起来像某种东西……现在你可能已经掌握了它,所以现在让我们做得更快一点。
- The next line “cmp [edx+28h], eax” compares edx+0x28 to eax. Thankfully, we know now that edx points to the FSPM_UPD structure, and we can calculate that at offset 0x28 inside that structure, it’s the field StackBase within the FspmArchUpd field…
下一行“cmp [edx+28h], eax”将 edx+0x28 与 eax 进行比较。值得庆幸的是,我们现在知道 edx 指向 FSPM_UPD 结构,并且我们可以计算出,在该结构内部偏移量 0x28 处,它是 FspmArchUpd 字段中的 StackBase 字段…… - and also, we still have in the back of our minds that ‘eax’ is initialized to zero, so, we know that the next 2 instructions are just checking if upd->FspmArchUpd.StackBase is == NULL.
而且,我们仍然记得“eax”被初始化为零,因此,我们知道接下来的两条指令只是检查 upd->FspmArchUpd.StackBase 是否 == NULL。 - Then we compare the StackSize with 0x26000, but the comparison is using “jb” for the jump, which is “jump if below”, so it checks if StackSize < 0x26000,
然后我们将 StackSize 与 0x26000 进行比较,但比较时使用“jb”进行跳转,即“如果低于则跳转”,因此它会检查 StackSize 是否 < 0x26000, - finally it does a “test” with “edx+30h” (which is the BootloaderTolumSize field) and 0xFFF, then it does an unconditional jump to loc_FFF4035C, which itself does a “jz” to the return..
最后,它使用“edx+30h”(即 BootloaderTolumSize 字段)和 0xFFF 进行“测试”,然后无条件跳转到 loc_FFF4035C,而后者本身会执行“jz”以返回。 - which means if (BootloaderTolumSize & 0xFFF == 0) it will return whatever EAX contained (which is zero),
这意味着如果 (BootloaderTolumSize & 0xFFF == 0) 它将返回 EAX 包含的内容(即零), - but if it doesn’t, then it will continue to the next instruction which is the “mov eax, 80000002h”.
但如果没有,那么它将继续执行下一条指令,即“mov eax,80000002h”。
So, we end up with this code:
因此,我们最终得到以下代码:
EFI_STATUS validate_upd_config (uint8_t action, void *config) {
  // eax = 0
  if (action == 3) {
    FSPM_UPD *upd = (FSPM_UPD *) config;
    if (upd == NULL)
       return 0;
    if (upd->FspUpdHeader.Signature != 0x4D5F4450554C524B /* 'KBLUPD_M'*/)
       return EFI_INVALID_PARAMETERS;
    if (upd->FspmArchUpd.StackBase == NULL)
        return EFI_INVALID_PARAMETERS;
    if (upd->FspmArchUpd.StackSize < 0x2600)
        return EFI_INVALID_PARAMETERS;
    if (upd->FspmArchUpd.BootloaderTolumSize & 0xFFF)
        return EFI_INVALID_PARAMETERS;
  } else {
    // loc_FFF40344
  }
  return EFI_SUCCESS
}
Great, we just solved half of our code! Don’t forget, we jumped one way instead of another at the start of the function, now we need to go back up and explore the second branch of the code (at offset 0xFFF40344). The code is very similar, but it checks for “KBLUPD_S” Signature, and nothing else. Now we can also remove any comment/notes we have (such as the note that eax is initialized to 0) and clean up, and simplify the code if there is a need.
太棒了,我们刚刚解决了一半的代码!别忘了,我们在函数开头跳转到了一个方向,而不是另一个方向,现在我们需要回溯并探索代码的第二个分支(偏移量 0xFFF40344)。代码非常相似,但它只检查“KBLUPD_S”签名,而不会检查其他任何内容。现在,我们还可以删除所有注释/注解(例如 eax 初始化为 0 的注释),并进行清理,如果需要的话,还可以简化代码。
So our function ends up being (this is the final version of the function):
所以我们的函数最终是(这是函数的最终版本):
EFI_STATUS validate_upd_config (uint8_t action, void *config) {
  if (action == 3) {
    FSPM_UPD *upd = (FSPM_UPD *) config;
    if (upd == NULL)
       return EFI_SUCCESS;
    if (upd->FspUpdHeader.Signature != 0x4D5F4450554C524B /* 'KBLUPD_M'*/)
       return EFI_INVALID_PARAMETERS;
    if (upd->FspmArchUpd.StackBase == NULL)
        return EFI_INVALID_PARAMETERS;
    if (upd->FspmArchUpd.StackSize < 0x2600)
        return EFI_INVALID_PARAMETERS;
    if (upd->FspmArchUpd.BootloaderTolumSize & 0xFFF)
        return EFI_INVALID_PARAMETERS;
  } else {
    FSPS_UPD *upd = (FSPS_UPD *) config;
    if (upd == NULL)
        return EFI_SUCCESS;
    if (upd->FspUpdHeader.Signature != 0x535F4450554C524B /* 'KBLUPD_S'*/)
        return EFI_INVALID_PARAMETERS;
  }
  return EFI_SUCCESS
}
Now this wasn’t so bad, was it? I mean, it’s time consuming, sure, it can be a little disorienting if you’re not used to it, and you have to keep track of which branches (which blocks in the layout view) you’ve already gone through, etc. but the function turned out to be quite small and simple. After all, it was mostly only doing CMP/TEST and JZ/JNZ.
现在看来还不错,不是吗?我的意思是,这确实很耗时,如果你不习惯的话可能会有点晕头转向,而且你还得记住已经检查过哪些分支(布局视图中的哪些块)等等。不过这个功能其实相当小巧简单。毕竟,它主要只是用来做 CMP/TEST 和 JZ/JNZ 的。
That’s pretty much all I do when I do my reverse engineering, I go line by line, I understand what it does, I try to figure out how it fits into the bigger picture, I write equivalent C code to keep track of what I’m doing and to be able to understand what happens, so that I can later figure out what the function does exactly… Now try to imagine doing that for hundreds of functions, some of them that look like this (random function taken from the FSPM module):
这几乎就是我在进行逆向工程时所做的全部工作,我逐行检查,了解它的作用,尝试弄清楚它如何融入更大的图景,编写等效的 C 代码来跟踪我正在做的事情并能够理解发生了什么,以便我以后可以弄清楚该函数到底是做什么的……现在尝试想象对数百个函数执行此操作,其中一些看起来像这样(从 FSPM 模块中获取的随机函数):
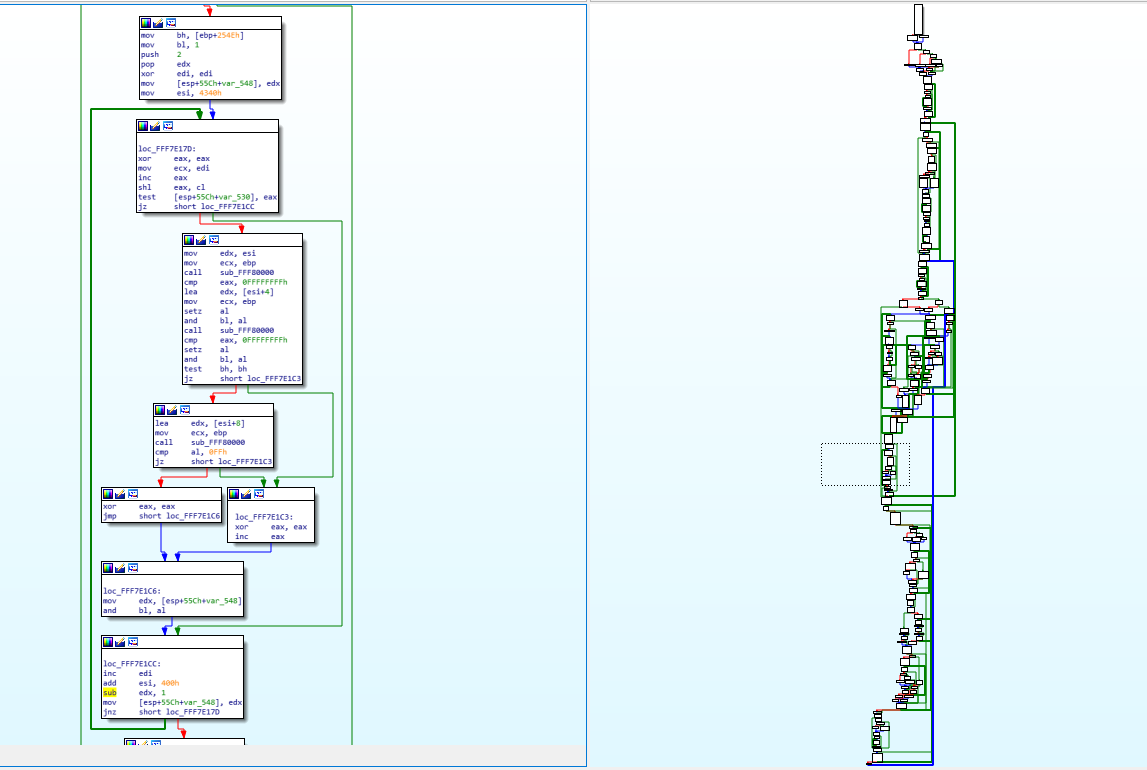
You can see on the right, the graph overview which shows the entirety of the function layout diagram. The part on the left (the assembly) is represented by the dotted square on the graph overview (near the middle). You will notice some arrows that are thicker than the others, that’s used in IDA to represent loops. On the left side, you can notice one such thick green line coming from the bottom and the arrow pointing to a block inside our view. This means that there’s a jump condition below that can jump back to a block that is above the current block and this is basically how you do a for/while loop with assembly, it’s just a normal jump that points backwards instead of forwards.
您可以在右侧看到图表概览,它显示了完整的函数布局图。左侧部分(汇编代码)由图表概览(靠近中间)上的虚线方块表示。您会注意到一些比其他箭头更粗的箭头,这些箭头在 IDA 中用于表示循环。在左侧,您可以注意到一条粗绿线从底部延伸,箭头指向视图内的一个块。这意味着下方有一个跳转条件,可以跳转到当前块上方的块,这基本上就是使用汇编代码进行 for/while 循环的方式,只不过它只是一个指向后方而不是前方的普通跳转。
Finally, the challenge! 终于,挑战了!
At the beginning of this post, I mentioned a challenging function to reverse engineer. It’s not extremely challenging—it’s complex enough that you can understand the kind of things I have to deal with sometimes, but it’s simple enough that anyone who was able to follow up until now should be able to understand it (and maybe even be able to reverse engineer it on their own).
在这篇文章的开头,我提到了一个逆向起来比较困难的函数。它其实并不难——它足够复杂,你可以理解我有时需要处理的事情;但它又足够简单,任何读到现在的人都应该能够理解它(甚至可能能够自己逆向)。
So, without further ado, here’s this very simple function:
因此,不用多说,这里有一个非常简单的功能:
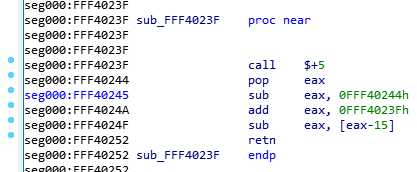
Since I’m a very nice person, I renamed the function so you won’t know what it does, and I removed my comments so it’s as virgin as it was when I first saw it. Try to reverse engineer it. Take your time, I’ll wait:
因为我人很好,所以我把这个函数改名了,这样你就不知道它的作用了,我还删除了我的注释,让它和我第一次看到它时一样原始。试着逆向一下。慢慢来,我等着:

Alright, so, the first instruction is a “call $+5”, what does that even mean?
好吧,那么,第一条指令是“call $+5”,这是什么意思呢?
- When I looked at the hex dump, the instruction was simply “E8 00 00 00 00” which according to our previous CALL opcode table means “Call near, relative, displacement relative to next instruction”, so it wants to call the instruction 0 bytes from the next instruction. Since the call opcode itself is taking 5 bytes, that means it’s doing a call to its own function but skipping the call itself, so it’s basically jumping to the “pop eax”, right? Yes… but it’s not actually jumping to it, it’s “calling it”, which means that it just pushed into the stack the return address of the function… which means that our stack contains the address 0xFFF40244 and our next instruction to be executed is the one at the address 0xFFF40244. That’s because, if you remember, when we do a “ret”, it will pop the return address from the stack into the EIP (instruction pointer) register, that’s how it knows where to go back when the function finishes.
我查看十六进制转储文件,发现指令只是“E8 00 00 00 00”,根据我们之前的 CALL 操作码表, 它的意思是“在附近、相对、相对于下一条指令位移调用”,所以它想在距离下一条指令 0 个字节的地方调用该指令。由于调用操作码本身占用 5 个字节,这意味着它正在调用自己的函数,但跳过了调用本身,所以它实际上是跳转到了“pop eax”指令,对吗?没错……但它实际上并不是跳转到那里,而是“调用它”,也就是说它只是将函数的返回地址压入堆栈……这意味着我们的堆栈包含地址 0xFFF40244,而我们要执行的下一条指令就是地址 0xFFF40244 处的指令。这是因为,如果你还记得的话,当我们执行“ret”时,它会将返回地址从堆栈弹出到 EIP(指令指针)寄存器中,这样它就知道函数完成时要返回到哪里。 - So, then the instruction does a “pop eax” which will pop that return address into EAX, thus removing it from the stack and making the call above into a regular jump (since there is no return address in the stack anymore).
因此,该指令执行“pop eax”,将返回地址弹出到 EAX 中,从而将其从堆栈中删除,并使上面的调用变成常规跳转(因为堆栈中不再有返回地址)。 - Then it does a “sub eax, 0FFF40244h”, which means it’s substracting 0xFFF40244 from eax (which should contain 0xFFF40244), so eax now contains the value “0”, right? You bet!
然后它执行了“sub eax, 0FFF40244h”,这意味着它从 eax 中减去 0xFFF40244(它应该包含 0xFFF40244),所以 eax 现在包含的值是“0”,对吗?没错! - Then it adds to eax, the value “0xFFF4023F”, which is the address of our function itself. So, eax now contains the value 0xFFF4023F.
然后,它将值“0xFFF4023F”添加到 eax 中,这是我们函数本身的地址。因此,eax 现在包含的值是 0xFFF4023F。 - It will then substract from EAX, the value pointed to by [eax-15], which means the dword (4 bytes) value at the offset 0xFFF4023F – 0xF, so the value at 0xFFF40230, right… that value is 0x1AB (yep, I know, you didn’t have this information)… so, 0xFFF4023F – 0x1AB = 0xFFF40094!
然后它将从 EAX 中减去 [eax-15] 指向的值,这意味着偏移量 0xFFF4023F – 0xF 处的 dword(4 字节)值,所以 0xFFF40230 处的值,对吧…该值是 0x1AB(是的,我知道,你没有这个信息)…所以,0xFFF4023F – 0x1AB = 0xFFF40094! - And then the function returns.. with the value 0xFFF40094 in EAX, so it returns 0xFFF40094, which happens to be the pointer to the FSP_INFO_HEADER structure in the binary.
然后函数返回..EAX 中的值为 0xFFF40094,因此它返回 0xFFF40094,这恰好是指向二进制文件中 FSP_INFO_HEADER 结构的指针。
So, the function just returns 0xFFF40094, but why did it do it in such a convoluted way? The reason is simple: because the FSP-S code is technically meant to be loaded in RAM at the address 0xFFF40000, but it can actually reside anywhere in the RAM when it gets executed. Coreboot for example doesn’t load it in the right memory address when it executes it, so instead of returning the wrong address for the structure and crashing (remember, most of the jumps and calls use relative addresses, so the code should work regardless of where you put it in memory, but in this case returning the wrong address for a structure in memory wouldn’t work), the code tries to dynamically verify if it has been relocated and if it is, it will calculate how far away it is from where it’s supposed to be, and calculate where in memory the FSP_INFO_HEADER structure ended up being.
那么,该函数只是返回 0xFFF40094,但为什么要用如此复杂的方式呢?原因很简单:因为 FSP-S 代码从技术上讲应该加载到 RAM 中的地址 0xFFF40000,但实际上它在执行时可以驻留在 RAM 中的任何位置。例如,Coreboot 在执行它时不会将其加载到正确的内存地址,因此不会返回错误的结构地址并导致崩溃(记住,大多数跳转和调用都使用相对地址,因此无论你把它放在内存的哪个位置,代码都应该能够工作,但在这种情况下,返回错误的结构地址是行不通的),代码会尝试动态验证它是否已被重定位;如果是,它会计算它与预期位置的距离,并计算 FSP_INFO_HEADER 结构最终在内存中的位置。
Here’s the explanation why:
原因如下:
- If the FSP was loaded into a different memory address, then the “call $+5” would put the exact memory address of the next instruction into the stack, so when you pop it into eax then substract from it the expected address 0xFFF40244, this means that eax will contain the offset from where it was supposed to be.
如果 FSP 被加载到不同的内存地址,那么“call $+5”会将下一条指令的精确内存地址放入堆栈,因此当您将其弹出到 eax 然后从中减去预期地址 0xFFF40244 时,这意味着 eax 将包含它应该在的位置的偏移量 。 - Above, we said eax would be equal to zero, yes, that’s true, but only in the usecase where the FSP is in the right memory address, as expected, otherwise, eax would simply contain the offset. Then you add to it 0xFFFF4023F which is the address of our function, and with the offset, that means eax now contains the exact memory address of the current function, wherever it was actually placed in RAM!
上面我们说过 eax 会等于零,没错,但这仅限于 FSP 位于正确内存地址的用例,否则,eax 只会包含偏移量。然后,你加上 0xFFFF4023F(也就是我们函数的地址),再加上偏移量,就意味着 eax 现在包含的是当前函数的准确内存地址,无论它实际位于 RAM 中的哪个位置! - Then when it grabs the value 0x1AB (because that value is stored in RAM 15 bytes before the start of the function, that will work just fine) and substracts it from our current position, it gives us the address in RAM of the FSP_INFO_HEADER (because the compiler knows that the structure is located exactly 0x1AB bytes before the current function). This just makes everything be relative.
然后,当它获取值 0x1AB(因为该值存储在函数开始前 15 个字节的 RAM 中,所以这样做没问题)并从当前位置减去该值时,它会返回 FSP_INFO_HEADER 在 RAM 中的地址(因为编译器知道该结构位于当前函数开始前 0x1AB 个字节的位置)。这使得一切都变得相对。
Isn’t that great!? ![]() It’s so simple, but it does require some thinking to figure out what it does and some thinking to understand why it does it that way… but then you end up with the problem of “How do I write this in C”? Honestly, I don’t know how, I just wrote this in my C file:
It’s so simple, but it does require some thinking to figure out what it does and some thinking to understand why it does it that way… but then you end up with the problem of “How do I write this in C”? Honestly, I don’t know how, I just wrote this in my C file:
是不是很棒!? ![]() 它很简单,但确实需要一些思考才能弄清楚它的作用,也需要一些思考才能理解它为什么这么做……但最终你会面临一个问题:“我该如何用 C 语言写这个程序?” 说实话,我不知道怎么做,我只是在我的 C 文件中写了这样一段代码:
它很简单,但确实需要一些思考才能弄清楚它的作用,也需要一些思考才能理解它为什么这么做……但最终你会面临一个问题:“我该如何用 C 语言写这个程序?” 说实话,我不知道怎么做,我只是在我的 C 文件中写了这样一段代码:
// Use Position-independent code to make this relocatable
void *get_fsp_info_header() {
    return 0xFFF40094;
}
I think the compiler takes care of doing all that magic on its own when you use the -fPIC compiler option (for gcc), which means “Position-Independent Code”.
我认为当您使用 -fPIC 编译器选项(对于 gcc)时,编译器会自行完成所有这些神奇的事情,这意味着“位置无关代码”。
What this means for Purism
这对 Purism 意味着什么
On my side, I’ve finished reverse engineering the FSP-S entry code—from the entry point (FspSiliconInit) all the way to the end of the function and all the subfunctions that it calls.
在我这边, 我已经完成了对 FSP-S 入口代码的逆向工程 ——从入口点(FspSiliconInit)一直到函数末尾以及它调用的所有子函数。
This only represents 9 functions however, and about 115 lines of C code; I haven’t yet fully figured out where exactly it’s going in order to execute the rest of the code. What happens is that the last function it calls (it actually jumps into it) grabs a variable from some area in memory, and within that variable, it will copy a value into the ESP, thus replacing our stack pointer, and then it does a “RETN”… which means that it’s not actually returning to the function that called it (coreboot), it’s returning… “somewhere”, depending on what the new stack contains, but I don’t know where (or how) this new stack is created, so I need to track it down in order to find what the return address is, find where the “retn” is returning us into, so I can unlock plenty of new functions and continue reverse engineering this.
然而,这只代表了 9 个函数和大约 115 行 C 代码;我还没有完全弄清楚它到底要去哪里才能执行剩余的代码。发生的事情是,它调用的最后一个函数(它实际上跳入其中)从内存中的某个区域抓取一个变量,并且在该变量内,它将一个值复制到 ESP,从而替换我们的堆栈指针,然后它执行“RETN”……这意味着它实际上并没有返回到调用它的函数(coreboot),而是返回……“某个地方”,取决于新堆栈包含的内容,但我不知道这个新堆栈在哪里(或如何创建),所以我需要跟踪它以找到返回地址,找到“retn”将我们返回到哪里,这样我就可以解锁大量新函数并继续对其进行逆向工程。
I’ve already made some progress on that front (I know where the new stack tells us to return into) but you will have to wait until my next blog post before I can explain it all to you. It’s long and complicated enough that it needs its own post, and this one is long enough already.
我在这方面已经取得了一些进展(我知道新的技术栈告诉我们应该返回到哪里),但你得等到我的下一篇博文才能全部解释清楚。它很长很复杂,需要一篇单独的文章,而这篇文章已经够长了。
Other stories from strange lands
来自陌生土地的其他故事
You never really know what to expect when you start reverse engineering assembly. Here are some other stories from my past experiences.
当你开始逆向工程组装时,你永远不知道会发生什么。以下是我过去经历的一些故事。
- I once spent a few days reverse engineering a function until about 30% of it when I finally realized that the function was… the C++ “+ operator” of the std::string class (which by the way, with the use of C++ templates made it excruciatingly hard to understand)!
我曾经花了几天时间对一个函数进行逆向工程,直到大约 30% 时,我才最终意识到该函数是… std::string 类的 C++“+ 运算符”(顺便说一句,使用 C++ 模板使得它变得极其难以理解)! - I once had to reverse engineer over 5000 lines of assembly code that all resolved into… 7 lines of C code. The code was for creating a hash and it was doing a lot of manipulation on data with different values on every iteration. There was a LOT of xor, or, and, shifting left and right of data, etc., which took maybe a hundred or so lines of assembly and it was all inside a loop, which the compiler decided that—to optimize it—it would unravel the loop (this means that instead of doing a jmp, it will just copy-paste the same code again), so instead of having to reverse engineer the code once and then see that it’s a loop that runs 64 times, I had to reverse engineer the same code 64 times because it was basically getting copy-pasted by the compiler in a single block but the compiler was “nice” enough that it was using completely different registers for every repetition of the loop, and the data was getting shifted in a weird way and using different constants and different variables at every iteration, and—as if that wasn’t enough— every 1/4th of the loop, changing the algorithm and making it very difficult to predict the pattern, forcing me to completely reverse engineer the 5000+ assembly lines into C, then slowly refactor and optimize the C code until it became that loop with 7 lines of code inside it… If you’re curious you can see the code here at line 39, where there is some operation common to all iterations, then 4 different operations depending on which iteration we are doing, and the variables used for each operation changes after each iteration (P, PP, PPP and PPPP get swapped every time), and the constant values and the indices used are different for each iteration as well (see constants.h). It was complicated and took a long while to reverse engineer.
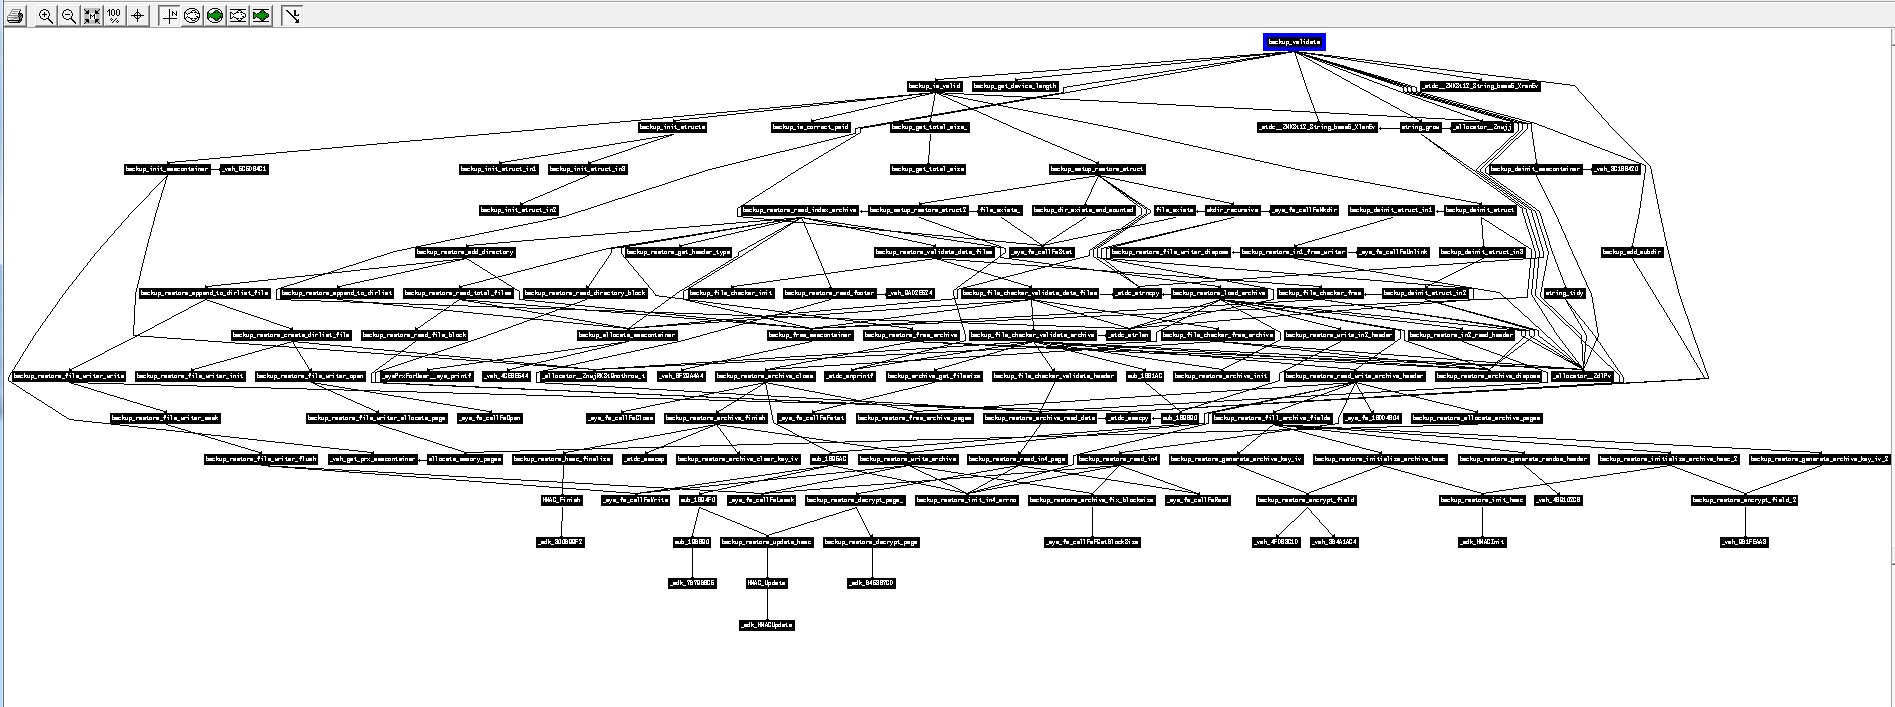
我曾经逆向了超过 5000 行汇编代码,结果全部解析成了……7 行 C 代码。这段代码用于创建哈希值,每次迭代都会对具有不同值的数据进行大量操作。 有大量的 xor、or、and、数据的左右移位等操作,这些操作可能占用了大约一百行汇编代码,而且它们都在一个循环内,编译器为了优化它,决定解开这个循环(这意味着它不会执行 jmp,而是再次复制粘贴相同的代码),因此,我不需要对代码进行一次逆向工程,然后发现它是一个运行 64 次的循环,而是必须对相同的代码进行 64 次逆向工程,因为它基本上是被编译器在一个块中复制粘贴的,但编译器足够“好”,它在循环的每次重复中都使用完全不同的寄存器,数据以奇怪的方式移位,每次迭代都使用不同的常量和不同的变量,而且——这还不够——循环的每 1/4 都会改变算法,使预测模式变得非常困难,迫使我将 5000 多条汇编代码完全逆向工程成 C 语言,然后慢慢重构和优化 C 代码直到它变成包含 7 行代码的循环……如果您好奇,可以看看这里的第 39 行代码,其中有一些所有迭代都通用的操作,然后根据我们正在执行的迭代有 4 种不同的操作,并且每个操作使用的变量在每次迭代后都会发生变化(P、PP、PPP 和 PPPP 每次都会交换),并且每次迭代使用的常量值和索引也不同(请参阅 Constants.h )。这很复杂,逆向工程花了很长时间。 - Below is the calling graph of the PS3 firmware I worked on some years ago. All of these functions have been entirely reverse engineered (each black rectangle is actually an entire function, and the arrows show which function calls which other function), and the result was the ps3xport tool. As you can see, sometimes a function can be challenging to reverse, and sometimes a single function can call so many nested functions that it can get pretty complicated to keep track of what is doing what and how everything fits together. That function at the top of the graph was probably very simple, but it brought with it so much complexity because of a single “call”:
下面是我几年前开发的 PS3 固件的调用图。所有这些函数都经过了完全逆向工程(每个黑色矩形实际上是一个完整的函数,箭头表示哪个函数调用了哪个函数),最终开发出了 ps3xport 工具。正如你所见,有时逆向一个函数可能非常困难,有时单个函数会调用很多嵌套函数,以至于很难追踪每个函数的功能以及它们是如何组合在一起的。图顶部的那个函数可能非常简单,但由于一个“调用”,它带来了如此大的复杂性:
Perseverance prevails 坚持不懈终将胜利
In conclusion: 综上所述:
- Reverse engineering isn’t just about learning a new language, it’s a very different experience from “learning Java/Python/Rust after you’ve mastered C”, because of the way it works; it can sometimes be very easy and boring, sometimes it will be very challenging for a very simple piece of code.
逆向工程不仅仅是学习一门新语言,它与“掌握 C 语言后学习 Java/Python/Rust”的体验非常不同,因为它的工作方式;它有时可能非常容易和无聊,有时对于一段非常简单的代码来说它会非常具有挑战性。 - It’s all about perseverance, being very careful (it’s easy to get lost or make a mistake, and very hard to track down and fix a mistake/typo if you make one), and being very patient. We’re talking days, weeks, months. That’s why reverse engineering is something that very few people do (compared to the number of people who do general software development). Remember also that our first example was 82 bytes of code, and the second one was only 19 bytes long, and most of the time, when you need to reverse engineer something, it’s many hundreds of KBs of code.
这一切都离不开毅力、细心(很容易迷失方向或犯错,而且一旦犯错/打字错误就很难追踪和修复),以及耐心 。我们说的是几天、几周、 几个月。 这就是为什么逆向工程是很少有人做的事情(与从事一般软件开发的人数相比)。还记得,我们的第一个示例代码有 82 个字节,而第二个示例只有 19 个字节长,而大多数情况下,当你需要对某个代码进行逆向工程时,它都会有数百 KB 的代码。
All that being said, the satisfaction you get when you finish reverse engineering some piece of code, when you finally understand how it works and can reproduce its functionality with open source software of your own, cannot be described with words. The feeling of achievement that you get makes all the efforts worth it!
话虽如此,当你完成一段代码的逆向工程, 最终理解它的工作原理,并能用自己的开源软件复现其功能时,那种满足感是无法用言语形容的。那种成就感让所有的付出都值得!
I hope this write-up helps everyone get a fresh perspective on what it means to “reverse engineer the code”, why it takes so long, and why it’s rare to find someone with the skills, experience and patience to do this kind of stuff for months—as it can be frustrating, and we sometimes need to take a break from it and do something else in order to renew our brain cells.
我希望这篇文章能帮助每个人重新认识“逆向工程代码”的含义,为什么它需要这么长时间,以及为什么很难找到一个拥有技能、经验和耐心来做这种工作几个月的人——因为它可能会令人沮丧,我们有时需要休息一下,做些其他事情来更新我们的脑细胞。